22 Mar 2024
During WWDC 2023, Apple announced the introduction of Privacy Manifests. The motivations behind Privacy Manifests are very much justified, but the way that this ecosystem-wide change is being forced upon developers with barely any support is frustrating to say the least.
I did originally write a lengthy rant about my experience, but I figure that it wasn’t entirely productive. Instead, if like me you are also frustrated and would like Apple to reconsider their approach, please submit a Feedback Request letting them know.
If you’ve never submitted a Feedback Request before, or you want help with what exactly you should write, read on. I’ll only take a couple of minutes!
- Head to feedbackassistant.apple.com and Sign In with your developer account
- Click the Compose New Feedback button at the top of the page
- Select Developer Tools & Resources
-
Enter the details below (or feel free to get creative yourself):
Please provide a descriptive title for your feedback:
Please better support developers with the upcoming Privacy Manifest requirements
Which area are you seeing an issue with?
Something else not on this list
What type of feedback are you reporting?
Suggestion
Please describe the issue and what steps we can take to reproduce it
For developers like me, the rollout of the Privacy Manifest requirements has been difficult and frustrating.
Please stop App Store Connect from reporting warnings about my Privacy Manifest and postpone any enforcement relating to the Privacy Manifest until you are able to better guide developers to implement the required changes. To help guide developers across the ecosystem, I suggest the following actions:
1. Complete the integration within Xcode and Swift Package Manager - Currently, manifests provided by third party developers have no way of being incorporated into the App's main PrivacyManifest.xcprivacy file when dependencies are statically linked to a target. It seems that the only workaround is for the developer to manually copy the contents of the third party Privacy Manifest into their own which is not sustainable.
2. Provide a tool or documentation to locally automate the analysis of required API usage - The warning emails from App Store Connect demonstrate that this is possible, so please provide a tool to assist developers in building Privacy Manifests instead of having to manually audit code against the documentation (which is subject to change). This tool should be usable by both app developers and third-party SDK developers.
3. Provide more assistance to third-party dependency managers - CocoaPods is still used by hundreds of thousands of developers, and it is critical that this tool properly supports Privacy Manifests. Please make more effort to support CocoaPods and other third-party tools by offering support via Developer Relations and/or sponsoring any required work.
4. Provide more documentation - Ensuring that Privacy Manifests are properly supplied and configured for first and third-party code is still not simple enough. Please provide more documentation, technical notes, and troubleshooting guides for ensuring that Privacy Manifests are set up correctly. There is currently no good resource on the internet for this, and developers are finding themselves overwhelmed having to figure it out against a deadline.
I (and I am sure many others) want to help respect the privacy of my users and provide them with full transparency, but with the current friction around Privacy Manifests, it is hard to do so, and I fear that by upsetting developers, it will have a negative effect on the overall goals of this change. For Privacy Manifests and required API usage declarations to be meaningful and effective, the process needs to be well-understood and frictionless, and I hope that these suggestions can be applied in order to help achieve the goals.
- Click Submit and hope for the best
Updated on 2024-03-22 at 15:44 CET: Added additional request to the list of actions.
02 Oct 2023
In Xcode 15 Apple introduced Strings Catalogs, a new file format (.xcstrings) that can be used as a single source for all of your apps localized string content.
Prior to Strings Catalogs, you typically defined your standard strings in a .strings file and your plural variations in a .stringsdict plist. Not only were these formats quite verbose, but you also had to then maintain a copy of each file for every supported language too.
The friction in this process often leads to compromises in one way or another and these compromises ultimately end up impacting the users of our apps, so it’s an understatement to say that I’m excited about the improvements that have shipped with Xcode 15 this year 🎉
A single Strings Catalog file can now contain regular strings, plural variations and device variations across all of the languages that your app supports. What is even better is that at compile time in Xcode 15, the contents of your Strings Catalog are converted back into .strings and .stringsdict resources that allow you to take advantage of the file format without having to change your deployment target!
So if a Strings Catalog is so great already, how can we possibly go about taking it to the next level?
The short answer is to use a new tool that I created called XCStrings Tool, but if you’re interested in understanding why I developed this tool, then please do read on:
How did we get here?
I’ve been working with Apple’s localization tooling for a while now, and if you have too, you might be familiar with some of the topics that I discuss. You might also be aware that there are existing tools out there such as R.swift and SwiftGen, but for the sake of a story, lets go all the way back to the beginning.
Localization Workflows - The Apple Way
When it comes to localizing your projects, Apple have always promoted a localization experience that typically starts with you defining your localized string content directly in your SwiftUI or UIKit view code using string literals.
Lets take some example code from Apple’s Food Truck sample app:
struct SocialFeedPlusSettings: View {
    @ObservedObject var controller: StoreSubscriptionController
    @AppStorage("showPlusPosts") private var showPlusPosts = false
    @AppStorage("advancedTools") private var advancedTools = true
    @Environment(\.dismiss) private var dismiss

    var body: some View {
        List {
            SubscriptionStatusView(controller: controller)
            Section("Settings") {
                Toggle("Highlight Social Feed+ posts", isOn: $showPlusPosts)
                Toggle("Advanced engagement tools", isOn: $advancedTools)
                NavigationLink("Social-media providers") {
                    EmptyView()
                }
            }
            #if os(iOS)
            Section {
                NavigationLink {
                    StoreSupportView()
                } label: {
                    Label("Subscription support", systemImage: "questionmark.circle")
                }
            }
            #else
            Section("Subscription support") {
                Button("Restore missing purchases") {
                    Task(priority: .userInitiated) {
                        try await AppStore.sync()
                    }
                }
            }
            #endif
        }
        .navigationTitle("Manage Social Feed+")
        .toolbar {
            #if os(iOS)
            let placement = ToolbarItemPlacement.navigationBarTrailing
            #else
            let placement = ToolbarItemPlacement.cancellationAction
            #endif
            ToolbarItemGroup(placement: placement) {
                Button {
                    dismiss()
                } label: {
                    Label("Dismiss", systemImage: "xmark")
                        #if os(macOS)
                        .labelStyle(.titleOnly)
                        #endif
                }
            }
        }
    }
}
In the code above, there are 8 strings that need to be localized:
- Settings
- Highlight Social Feed+ posts
- Advanced engagement tools
- Social-media providers
- Subscription support
- Restore missing purchases
- Manage Social Feed+
- Dismiss
You aren’t expected to manually copy these strings into your Strings Catalog, instead, building your project with the Use Compiler to Extract Swift Strings build setting (enabled by default) will tell Xcode to automatically populate these strings into the Strings Catalog for you.
Sounds great? Well it actually is. But like many things with Apple, we can quickly find that this process doesn’t quite scale how we might hope that it does.
The Apple Way holds up pretty well for relatively small apps that don’t have a text-heavy UI, but as the complexity grows, the cracks in this process start to show.
Relying on the extraction of string literals alone is a great start, but what if we need to think about some other things:
- Providing context to translators via comments
- Breaking out our translations across multiple localization tables
- Using translations from different targets/modules
- Scenarios where a phrase in the source language could mean different things based on context in another language
For the extraction of a string literal like Text("Settings") to be sufficient, a few things have to be true:
- The localization key is called
Settings.
- The value of the localization in the default language is Settings.
- A translator can infer the context from the word Settings alone.
- The localizations for this phrase are in the file called Localizable.xcstrings.
- The Strings Catalog is found in the Apps main bundle (
Bundle.main).
In one of the more extreme scenarios, you might find that your simple string literal ends up having to become something like the following:
Text(
  "Settings",
  tableName: "Social", // Social.xcstrings
  bundle: .module, // The correct Bundle for Swift Package target resources
  comment: "A section heading title for the Social Feed Plus configuration options"
)
To cover all cases, we need 4-6 lines of code to properly describe the word Settings. Considering how far you can get with 4 lines of SwiftUI, it seems absurd that a single localized string might take up this much code in your view.
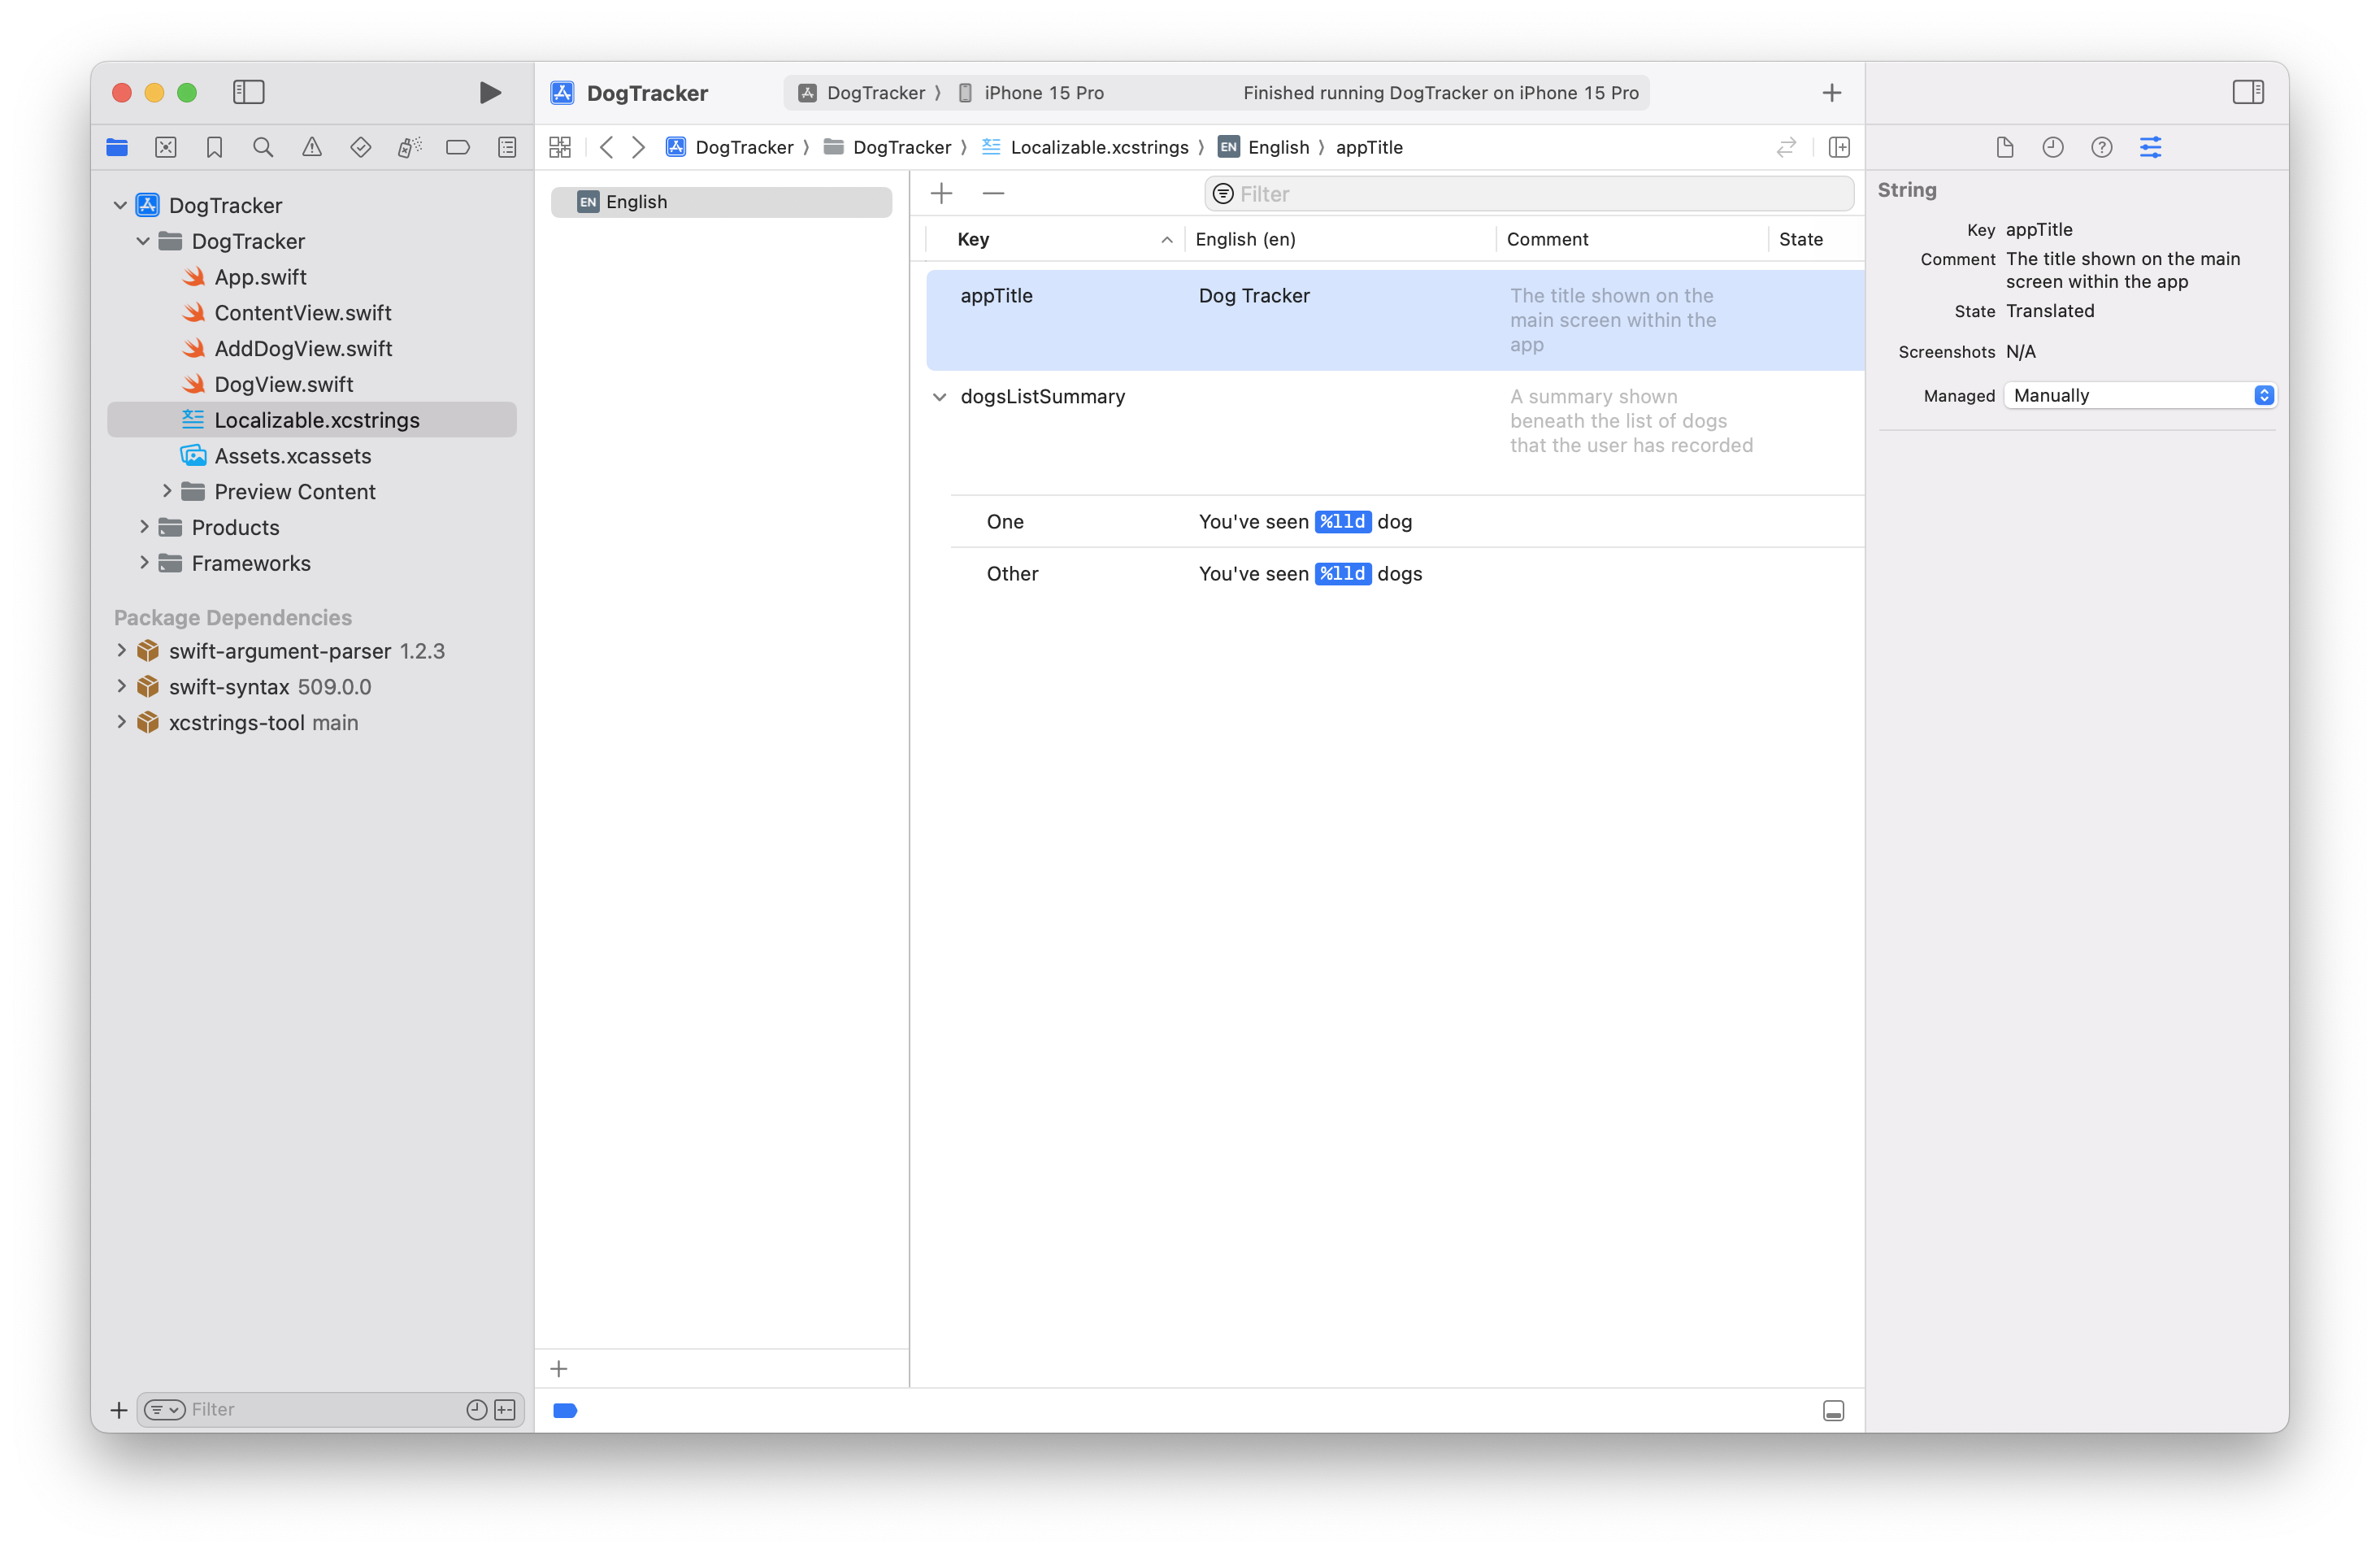
Creating Strings in your Strings Catalog
Once you find that defining all of your localized Strings context in your Swift source code isn’t good enough, you will instead want to start manually defining the values in your Strings Catalog instead.
By doing so, we instantly gain two benefits:
- We have more control over the localized string key
- We’ve moved our translator comments out of the source code

In the String Catalog above, we’ve manually added a string with the key settingsHeading by clicking the + button at the top of the editor. You can tell that this string was manually added because the attributes inspector (right) shows it as Manually managed.
Note: If a string is Automatically managed, Xcode will not allow you to edit its values in the source language within the Strings Catalog and it will delete the string if it cannot find the key referenced at compile time.
The default value of this string (Settings) and the comment remain defined in the Strings Catalog, so when we can reference the string in our UI code, we can do so like the following:
Text("settingsHeading", tableName: "Social", bundle: .module)
Essentially, we’ve ditched the translator comment, which is an improvement, but by following this approach we’ve also gained another problem. Now that Xcode isn’t automatically managing the string in our Strings Catalog, the source of truth has shifted from the Source Code to the Strings Catalog.
This isn’t such a bad thing, but our Strings Catalog isn’t exposing any Swift code for us to reference in our project. Instead, we have to use string typed keys as if we’re living in the stone age.
So lets define some Constants
When you find yourself having to work with a string typed API repeatedly, especially if you need to reference the same key more than once, a common way to keep this under control is to define a set of constants to help reduce the risk of typos and maintain a bit of consistency in your project. For example:
struct SocialStrings {
  static let settingsHeading: LocalizedStringKey = "settingsHeading"
}

// ...

Text(SocialStrings.settingsHeading, tableName: "Social", bundle: .module)
And starting in iOS 16 and macOS 13, we can even bring the table and bundle configuration into this constant using Foundation’s new LocalizedStringResource type:
struct SocialStrings {
  static let settingsHeading = LocalizedStringResource(
    "settingsHeading",
    table: "Social",
    module: .atURL(Bundle.module.bundleURL)
  )
}

// ...

Text(SocialStrings.settingsHeading)
Note: The LocalizedStringResource type isn’t supported directly by all SwiftUI views/modifiers so sometimes you need some workarounds (FB13221647).
There are a few ways to workaround this in the meantime:
// 1. Use an alternative method/overload that accepts Text
Button(action: { /* ... */ }) {
  Text(SocialStrings.dismissTitle)
}

// 2. Use a method/overload that accepts LocalizedStringKey and then use string interpolation
Button("\(SocialStrings.dismissTitle)", action: { /* ... */ })

// 3. Use a method/overload that accepts String and resolve the localized value first
//    Note: by using this approach, custom locale information set in the environment might be ignored
Button(String(localized: SocialStrings.dismissTitle), action: { /* ... */ })
This is a great solution that is relatively straightforward to implement. It looks like a winner right?
But what about the arguments?
We haven’t looked at passing arguments into localized strings yet, so lets go back to the start quickly:
Text("There are \(items.count) pending posts")
With the example above, when the compiler extracts this string, it will assign the key There are %lld pending posts inside the Strings Catalog.
But we’ve decided to manually define our keys using an identifier style format and format specifiers don’t really fit in this pattern, so what do we do?
Because each string in the Strings Catalog has a distinct field for the Key and the Value, you can define your strings containing variables like so:
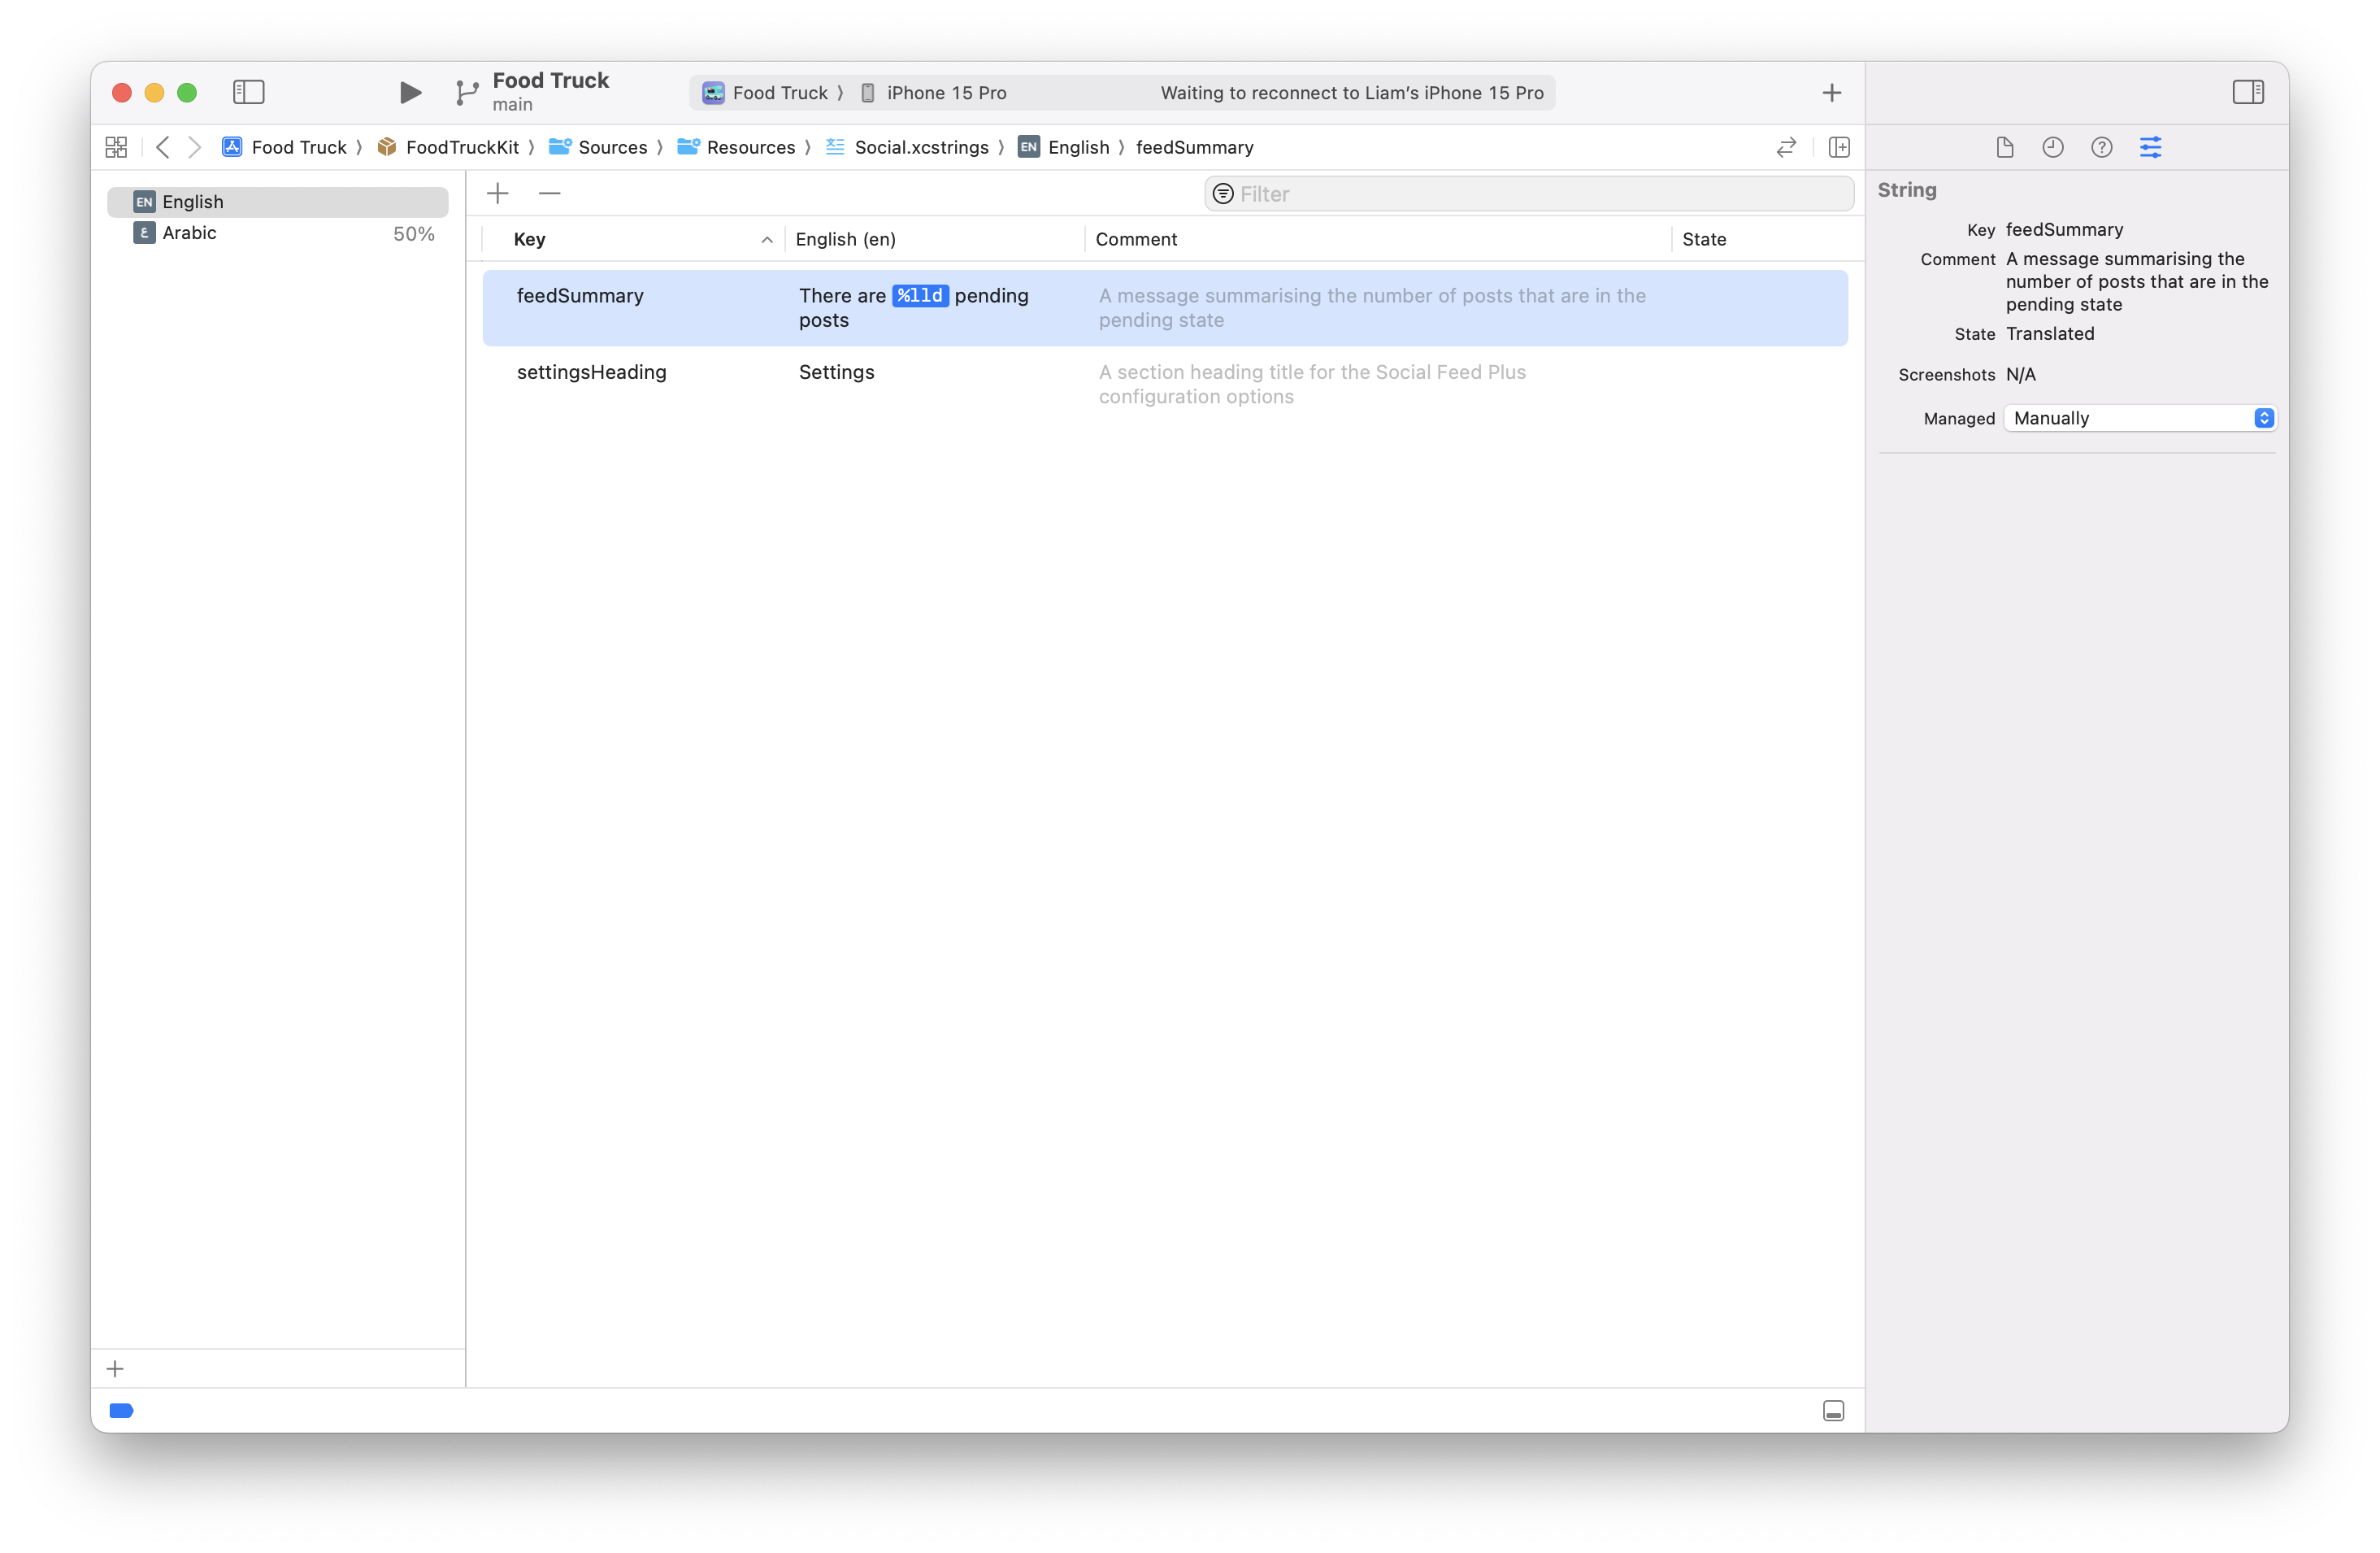
The trick is then to use LocalizedStringResource’s defaultValue parameter:
static func feedSummary(_ count: Int) -> LocalizedStringResource {
  LocalizedStringResource(
    "feedSummary",
    defaultValue: "There are \(count) pending posts",
    table: "Social",
    module: .atURL(Bundle.module.bundleURL)
  )
}

// ...

Text(SocialStrings.feedSummary(items.count))
The defaultValue parameter is not a String, but instead it’s a String.LocalizationValue type.
This type allows Foundation to track the values that are interpolated into the literal (such as count) and then use them when resolving the actual localized string from the Strings Catalog later on.
Recap
To recap on the journey that we’ve been on:
- Apple encourage you to define your localized strings in source code and let the compiler copy them into your Strings Catalog.
- But this isn’t a great approach for long strings, scenarios where you need to provide comments, or when you need to specify a different table or bundle.
- The alternative is to reference manually managed strings, but this is done using a string-typed key that is prone to typos.
- To reduce the risk of typos, it’s a good practice to use static properties or methods to reference the localized strings in Swift instead.
- Using keys as identifiers to makes providing variables/arguments a bit trickier in the modern
LocalizedStringResource type.
So to conclude, we see a value in making the Strings Catalog the source of truth for all localized string content, but having to manually define helper/boilerplate accessors in Swift still has annoying downsides.
Hopefully you can see where I am going with this (spoiler: it’s not a Macro)…
I created XCStrings Tool as a modern solution to generating Swift code to interface with a Strings Catalog.
- Integrate the XCStrings Tool Plugin to your target
- Manually define your Strings in your Strings Catalogs
- Reference your strings using the accessors that XCStrings Tool adds to
LocalizedStringResource
// Before
Text("settingsHeading", tableName: "Social", bundle: .module)
Text(
  LocalizedStringResource(
    "feedSummary",
    defaultValue: "There are \(count) pending posts",
    table: "Social",
    module: .atURL(Bundle.module.bundleURL)
  )
)

// After
Text(.social.settingsHeading)
Text(.social.feedSummary(items.count))
When added to either an Xcode Project or Swift Package target, the build tool will process each Strings Catalog and generate an extension on LocalizedStringResource that can be used to access each localized string within that catalog.
To get started with XCStrings Tool, check out the documentation hosted on the Swift Package Index.
You can also visit the GitHub Discussions for further support or to provide feedback.
12 Jun 2023
During WWDC 2023, Apple announced a new method on UIViewController called viewIsAppearing(_:).
If you’ve ever spent way too much time trying to perfect appearance animations within your apps, this new method may just be the lifecycle callback that you had been looking for since it’s called prior to the actual appearance on-screen but after receiving the initial layout and traits.
What is even better is that it was announced that this method has been back-deployed all the way down to iOS 13, which is great, but if like me you want to use it in your apps today, you’ll find that unfortunately you still need to wait for Xcode 15 and the iOS 17…
Or do you?
What does being back-deployed actually mean here?
While Apple mentioned that this method back-deploys all the way to iOS 13, this is a little bit confusing. If you follow along with Swift Evolution proposals, you may well have understood this statement to have meant that the API was built using the new @backDeployed attribute that was proposed in SE-0376 and implemented in Swift 5.8. This however is not the case here.
In this instance, the viewIsAppearing(_:) method has existed in UIKit since the iOS 13 SDK first shipped but the method was not made visible in the public headers that our code can see.
In the iOS 17 SDK, Apple have finally declared this method in the public SDK headers meaning that our code can now reference the previously private implementation that has been shipping since iOS 13. In fact, you can look for yourself in class dumps from older versions of the iOS SDK (example).
Using the method in Xcode 14 or earlier
So if the method already existed in the iOS 13, 14, 15 and 16 SDKs, you might wonder what is stopping you from using it? Well it turns out that there is not a lot thanks to the fact that this portion of UIKit is still written in Objective-C!
In your project, add a new file called UIViewController+UpcomingLifecycleMethods.h:
#import "Availability.h"

#if defined(__IPHONE_17_0)
#warning "UIViewController+UpcomingLifecycleMethods.h is redundant when compiling with the iOS 17 SDK"
#else

@import UIKit;

@interface UIViewController (UpcomingLifecycleMethods)

/// Called when the view is becoming visible at the beginning of the appearance transition,
/// after it has been added to the hierarchy and been laid out by its superview. This method
/// is very similar to -viewWillAppear: and is always called shortly afterwards (so changes
/// made in either callback will be visible to the user at the same time), but unlike
/// -viewWillAppear:, at the time when -viewIsAppearing: is called all of the following are
/// valid for the view controller and its own view:
///    - View controller and view's trait collection
///    - View's superview chain and window
///    - View's geometry (e.g. frame/bounds, safe area insets, layout margins)
/// Choose this method instead of -viewWillAppear: by default, as it is a direct replacement
/// that provides equivalent or superior behavior in nearly all cases.
///
/// - SeeAlso: https://developer.apple.com/documentation/uikit/uiviewcontroller/4195485-viewisappearing
- (void)viewIsAppearing:(BOOL)animated API_AVAILABLE(ios(13.0), tvos(13.0)) API_UNAVAILABLE(watchos);

@end

#endif
The next step depends on your current project setup:
- If you have an Objective-C project, you can go ahead and import
UIViewController+UpcomingLifecycleMethods.h in any view controller that you need to access this method within and if you have a Swift project, you can expose this via the Bridging Header.
- If you have a Swift project and don’t currently use a Bridging Header, open the Build Settings for your target and set Objective-C Bridging Header (
SWIFT_OBJC_BRIDGING_HEADER) to $(SRCROOT)/Path/To/UIViewController+UpcomingLifecycleMethods.h.
- If you have a Swift project and are already using a Bridging Header for other reasons, import
UIViewController+UpcomingLifecycleMethods.h within your existing Bridging Header.
In the header, we defined a category (extension in Swift) with the private (but soon-to-be-public) method signature. We don’t provide the method implementation because it already exists so this alone is enough to expose the method to the rest of our project.
In your UIViewController subclasses, you can now go ahead and override the method just like you can when using Xcode 15:
override func viewIsAppearing(_ animated: Bool) {
    super.viewIsAppearing(animated)
    prepareForAppearance()
}
Because the header file is checking for the __IPHONE_17_0 definition, which is only available as part of Xcode 15 and the iOS 17 SDK, this header becomes redundant once you start using Xcode 15. I’ve used #warning to trigger a custom warning message that can serve as a helpful reminder to come back in September and clean up.
Warning: While you can do this with many other private methods, remember that private API wasn’t necessarily designed to be consumed by other developers and its behavior might well change (or be removed entirely) in future releases, which would likely break your app.
In this instance, we don’t have these same concerns because we know that Apple is making this API public moving forward. But you should still remember that this API is technically private today meaning that there is still a small chance that it might be rejected during App Review. I haven’t yet verified myself that apps currently referencing this API won’t be rejected, so submit for review at your own discretion.
Alternative Approach
Alternatively, if you work with a fully Swift-based project (i.e Swift Playgrounds) or don’t want the additional complexity of managing a bridging header, you could also achieve similar results with an extension:
#if swift(<5.9) // A similar check for the iOS 17 SDK assuming you don't use custom toolchains
extension UIViewController {
    @objc
    @available(iOS, introduced: 13.0)
    @available(tvOS, introduced: 13.0)
    func viewIsAppearing(_ animated: Bool) {
        assertionFailure("The UIKit implementation was not called as expected")
    }
}
#endif
This approach works in a similar way by exposing an @objc method called viewIsAppearing(_:) for your app, but it relies on a method name clash for the super calls to actually call the UIKit implementation rather than the one that you defined above.
I’ve tried this in a test project and it seems to work as expected, but there is a small risk involved here which is why it would be more preferred to define the Objective-C header instead if possible.
01 Aug 2020
So following Apple’s announcement during WWDC 2020 that they’ll be transitioning the Mac away from Intel processors to Apple Silicon it’s now time for everybody to get their software ready.
The transition this time can be considered somewhat easier for most people, especially those who are already supporting arm64 on iOS but there is still work to be done to ensure that tooling and pre-compiled distributions support both architectures ready for when Mac using Apple Silicon are made publicly available. If you haven’t already seen it, a lot of this is covered in the Port your Mac app to Apple Silicon WWDC Session Video.
If you’re using Xcode to compile your command line tools then things are pretty simple as long as you are setting the ARCHS build setting to $(ARCHS_STANDARD) (the default). In Xcode 12, this value is described as Standard Architectures (64-bit Intel and ARM) but if you’re using Swift Package Manager to build and distribute your binary or library, there is no such option.
Instead, starting in Swift Package Manager for Swift 5.3 (Xcode 12), the swift-build executable has now introduced the --arch option (apple/swift-package-manager#2787).
Building a Universal Binary
Firstly, make sure that you are using the correct version of Xcode/Swift:
$ xcrun swift build --version
Swift Package Manager - Swift 5.3.0
Note: If this is not Swift 5.3 or greater, use xcode-select -s to switch to the Xcode 12 beta.
Now, when compiling your package, specify both architectures to compile a Universal Binary:
$ xcrun swift build -c release --arch arm64 --arch x86_64
To verify that your built binary contains both architectures, you can use the lipo -info command to inspect a binary and confirm:
$ lipo -info .build/apple/Products/Release/swiftlint
Architectures in the fat file: .build/apple/Products/Release/swiftlint are: x86_64 arm64
And there you have it, building your Swift Package as a Universal Binary is as simple as that!
06 Feb 2017
So you’ve seen Firebase Remote Config and decided that it would go great in your Swift project? You’re right, it will but if like me you’ve noticed that the design of the SDK doesn’t play very well with all of your other beautiful looking strictly typed Swift code then this post is for you.
Note: I don’t cover setting up Firebase in this post, just using FIRRemoteConfig in a configured project. Check out one of these guides for help with the setup part.
Lets take this basic example:
let count = FIRRemoteConfig.remoteConfig()["maximum_item_count"].numberValue?.intValue ?? 10
There are a few problems here:
- Damn it doesn’t look great.
numberValue returns an optional.- The key/value pattern means that you can’t guarantee that you’ve not made a typo or updated the key name somewhere else.
- Because of the optional, you either have to force unwrap or have a fallback.
- Carelessly force unwrapping is never a good thing and defeats the object of Swift’s type safety.
- Having a fallback defeats the object of the nice default values that you specify upon initialising Remote Config.
- Littering all your classes with
import FirebaseRemoteConfig will probably be a pain to undo once you decide to move away from Firebase.
It would be a lot nicer if we could do something like this instead:
let count = Config.shared.maxItemCount
Config.swift
The interface for my Config class is pretty simple:
import Foundation
import FirebaseRemoteConfig

final class Config {

    /// The shared instance of config to use
    static let shared: Config = Config()

    /// The maximum number of items that are allowed in this mystery app
    let maxItemCount: Int

    /// The initialiser is private as intended use is via the `shared` static property.
    private init() {

        ...
    }
}
The idea is simple: Initialise all the properties on the shared instance after performing the initial fetch and then trigger another fetch after so that we can be ready to load any changes the next time the app launches.
This is intentional to ensure that the values in Config are all fetched from a consistent data source (i.e to avoid accidentally reading one default value before calling activateFetched and then another remote value after the fetch completed).
As a result, the initialiser looks like this:
// 1. Configure for dev mode if we need it, otherwise a 1 hour expiration duration
let remoteConfig = FIRRemoteConfig.remoteConfig()
#if DEBUG
    let expirationDuration: TimeInterval = 0
    remoteConfig.configSettings = FIRRemoteConfigSettings(developerModeEnabled: true)!
#else
    let expirationDuration: TimeInterval = 3600
#endif

// 2. Set our default values and keys
remoteConfig.setDefaults([
    "maximum_item_count": 42 as NSNumber
])

// 3. Activate any fetched values before we read anything back
remoteConfig.activateFetched()

// 4. Now set the properties on config based on what we have currently
self.maxItemCount = remoteConfig["maximum_item_count"].numberValue!.intValue

// 5. Perform the next fetch so that it's ready when we re-launch
remoteConfig.fetch(withExpirationDuration: expirationDuration) { status, _ in
    print("[Config] Fetch completed with status:", status, "(\(status.rawValue))")
}
Here is a breakdown of what we are doing:
- If the app is running in debug mode, I enable dev mode and disable the
expirationDuration so that the config refreshes each time. This is very handy during development but will get you throttled server side if you release something like that to production.
- Set the default keys and values. I’ve opted to do this in code and not by using a plist so that I can have visibility of all the keys and values later on when I fetch them.
- Activate any fetched parameters from the previous launch before we attempt to read them.
- Read the fetched or default parameters back and set them as instance variables.
- Perform a fetch asynchronously to get any changes that we can then activate the next time we launch the app.
There are still a few non-swifty looking bits here because I’m not using any form of constants to define the duplicate usage of maximum_item_count and I’m also force unwrapping the value however it does come with the following upsides:
- Only requires a single unit test to ensure that any of the force unwrapping isn’t causing a crash.
- All the non-swifty looking code is isolated in a single file instead of across my entire project.
- I could easily update the
Config class in the future to completely remove the dependancy of Firebase from my project if I wanted to.
- The rest of my code looks fabulous (kinda).
The complete class can be found here if you wish to grab a copy. Enjoy!
Note
Due to the nature of Swift, the static shared property won’t be initialised until you try to access it. This means that it might be useful doing something like the following in your AppDelegate if you want to ensure that the next fetch is performed as soon as possible:
func application(_ application: UIApplication, didFinishLaunchingWithOptions launchOptions: [UIApplicationLaunchOptionsKey: Any]?) -> Bool {

    FIRApp.configure()
    _ = Config.shared

    return true
}
I’m sure that could be done in a nicer way but I’ll let you figure that out :)